While we are sad to see some of the Cisco Small Business 300 series switches go End-of-Sale, we welcome the 350/550X series with open arms.
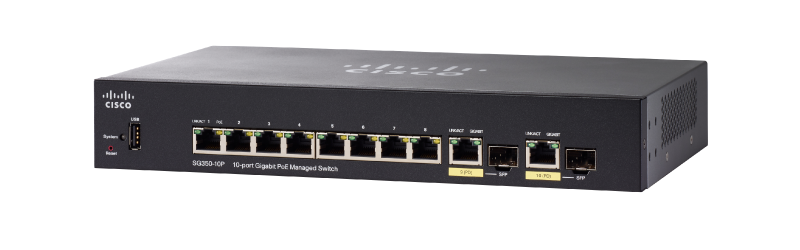
Cisco has expanded their offering of Small Business Switches to the SG350 or SG550X models. Strangely, some 300 series models have been given end-of-sale and end-of-support dates (see the official model list here) while others have not. So, while the decision to discontinue some- while not other 300’s is weird, we’re happy to see the SG350 and SG550X get some subtle updates like an actual RJ45 console port just like it’s Catalyst brothers. Any way you slice it, Cisco now gives more bang for your buck in these small / branch office inexpensive switch models.
While configuration examples are plenty on the official Cisco support page for these switches, there was only instructions for upgrading firmware via the GUI which is nice, but many of us are so used to managing everything via SSH this guide will walk you through it.
What happened to the firmware format?
You may notice that the firmware version (numbers, etc) are different from 300 series. We won’t get into the details about that here, but just know you can’t load 300 series switch firmware on 350’s or 550X’s
Some assumptions before we start:
- Have SSH or Console access configured to connect to the switch via the command line.
- Have a TFTP server configured on the same network as your switch so you can copy the firmware image.
- When writing a new firmware to a switch there is a chance that the process can wipe the configuration, so you will want to make a backup first or just be prepared to set it up from scratch again once the upgrade(s) are complete. Do remote upgrades with caution!
- We will use a SG350-10 for this guide, but the process is similar for all SG350 or SG550X systems.
Step 1: Check your current firmware version.
For this example we are going to upgrade to 2.4.5.71. The current version loaded on the switch is at 2.3.5.63, you can check this using the show version command.
Step 2: Backup the existing configuration just in case something goes sideways, we can restore the configuration if necessary.
Step 3: Download the firmware from cisco.com (or another switch) and make it available via TFTP server. Copy the new image into flash on the switch.
The new firmware file should be sitting on the root of the flash file system. To verify use the dir command.
“Boot System Image” doesn’t work anymore?
The boot system command still works, but it’s slightly different because you have to include the location of where you uploaded the firmware file.
Step 4: Tell the switch to extract the firmware to make it available for boot and set it as active on the next reload.
Verify that the new firmware is extracted and ready to go.
Notice that the Inactive-image is currently set to Active after reboot. If you’re having second thoughts about rebooting to the new version of firmware you can bailout by executing the command: boot system inactive-image. It sounds counter-intuitive but if the desired behavior is to keep 2.3.5.63 after reboot and not go to the updated version, this will make sure that happens. If you’re ready to go to the new version proceed to step 5!
Step 5: Reboot the switch using the reload command and be sure to save changes before doing so.
Step 6: Wait for the switch to reboot, then verify that the new image is being used.
Pretty easy stuff, it’s just that some of the command syntax is a bit different than it was on the previous generation of Cisco Small Business switches. I hope this has been simple to follow and helps anyone new to the SG350 or SG550X switches with upgrading the firmware through the command line.


It is a bit weird to copy the firmware image to the flash, and then copy it again (boot system just does a copy) to an image location.
You can use “boot system” to directly retrieve the firmware image over TFTP (or SCP). You don’t need to have an intermediate copy.
Awesome, thanks Tom! That’s a nice time saving tip.